


Central Vacuum VacPan Repair Kit

As low as
$17.98
")
CON:AD:0005
The VacPan Repair Kit is an easy DIY (Do It Yourself) kit that contains all you need to repair a damaged toe-kick switch on your VacPan automatic dustpan inlet. Available in three colors (black, white, and almond). Contains common parts to service your Vacpan sweep inlet.

Quick & Easy
Ordering
Ordering
1SELECT PRODUCT OPTIONS
Repair your existing central vacuum VacPan with the DIY (Do It Yourself) VacPan Repair Kit. Repairing your toe kick can be accomplished in under 10 minutes and all that's required is a Phillips head screwdriver.
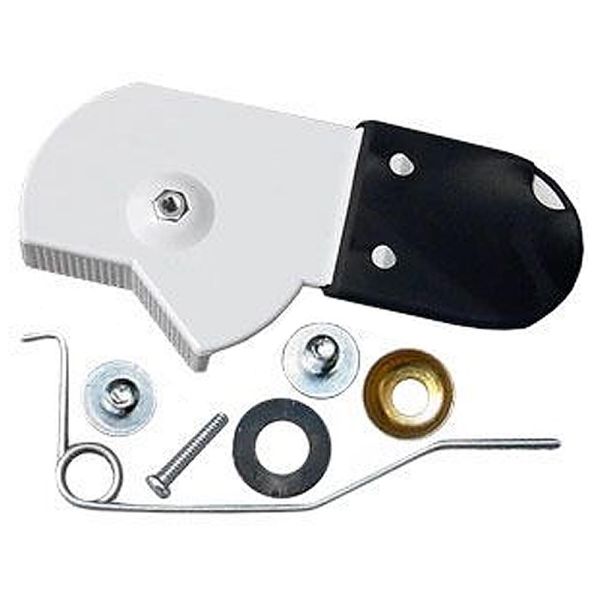
Contents:
- Toe-kick Lever w/ Nut
- Spring
- Brass Cap
- Long Bolt
- Plastic Sleeve
- Two(2x) Coarse Thread Screws
VacPan Repair Kit Help and Instructions
 1. Parts Included
The VacPan repair kit comes with the following part's: Toe kick Lever with a nut installed, spring, brass cap, Long bolt, plastic sleeve, 2 coarse thread screws. You will require a Philips screwdriver for the repair.
 2. Removing Original Parts
Remove the original parts. Keep is the plastic washer on the pivot point of the lever shown above.
 3. Installing New Hardware
Re-use the plastic washer. Insert the toe kick lever at the front of the VacPan. Hold the nut in place & tighten the long bolt with the plastic washer under it. Set the brass cap on the back post use 1 coarse screw. Position the spring as shown with the plastic sleeve, use the other coarse screw.
 4. Verify The Switching Mechanism
Once the hardware is installed and screws are tightened move the toe kick lever to the back and forth. Off should be as shown above.
 5. Finished
Repair should be as shown above with the spring making contact with the brass cap.
Product Description
Product Reviews
Read about the Repair Kit For VacPan Dustpan
Repair your existing central vacuum VacPan with the DIY (Do It Yourself) VacPan Repair Kit. Repairing your toe kick can be accomplished in under 10 minutes and all that's required is a Phillips head screwdriver.
Contents:
- Toe-kick Lever w/ Nut
- Spring
- Brass Cap
- Long Bolt
- Plastic Sleeve
- Two(2x) Coarse Thread Screws
VacPan Repair Kit Help and Instructions
1. Parts Included
The VacPan repair kit comes with the following part's: Toe kick Lever with a nut installed, spring, brass cap, Long bolt, plastic sleeve, 2 coarse thread screws. You will require a Philips screwdriver for the repair.
2. Removing Original Parts
Remove the original parts. Keep is the plastic washer on the pivot point of the lever shown above.
3. Installing New Hardware
Re-use the plastic washer. Insert the toe kick lever at the front of the VacPan. Hold the nut in place & tighten the long bolt with the plastic washer under it. Set the brass cap on the back post use 1 coarse screw. Position the spring as shown with the plastic sleeve, use the other coarse screw.
4. Verify The Switching Mechanism
Once the hardware is installed and screws are tightened move the toe kick lever to the back and forth. Off should be as shown above.
5. Finished
Repair should be as shown above with the spring making contact with the brass cap.
Log In
Create New Account