


How to Clean a Bagless Vacuum Cleaner
Table of Contents
- How to Clean a Bagless Vacuum Cleaner
- Step 1: Gather Your Tools
- Step 2: Break Down Your Vacuum
- Step 3: Wash Parts and Let them Air Dry.
- Step 4: Dust the Inside Compartments of the Vacuum.
- Step 5: Remove the Rotating Floor Brush and Clean.
- Step 6: Check the air passageway for clogs before Reassembling the Floor Brush.
- Step 7: Re-assemble Your Vacuum, Pop in a New HEPA Filter
- Resources and References:
How to Clean a Bagless Vacuum Cleaner
 Many users of bagless vacuums get to a point when the suction of their beloved vacuums fail. Before wondering why your vacuum cleaner is misbehaving and flinging debris across the room with every sweep instead sucking it up, you should think about how long it has been since you actually performed any other recommended maintenance on your vacuum besides emptying the dustbin regularly. If you're there, it might be time to show a little more love to the big dusty thing.
Step 1: Gather Your Tools
First, you'll need to gather up a few supplies and tools to have handy. You'll need:- A can of compressed air for dusting
- Your vacuum's owner's manual for reference
- Dish soap (and you might want to empty your sink)
- Dust cloth
- Elbow grease
- A screwdriver
- Scissors
- New filter for your vacuum
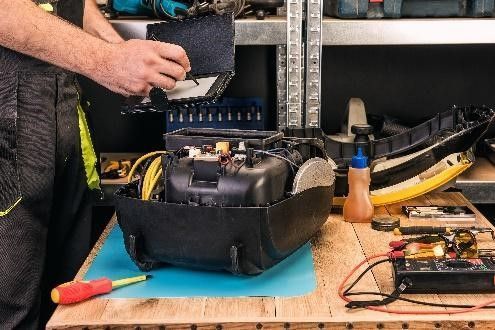
Step 2: Break Down Your Vacuum
To get started, you'll want to remove all the washable and replaceable parts of your bagless vacuum cleaner. On my model and most other uprights, that includes the dust bin, the secondary cyclone piece above the dust bin, all attachment accessories, the pre-motor filter, and HEPA post-motor filter.Step 3: Wash Parts and Let them Air Dry.
Next, you'll want to dunk every part that can be washed (consult your owner's manual for this crucial info) into a sink of soapy water. Fortunately, my vacuum's dust bin, secondary cyclone, extension wands, and pre-motor filter can all be washed with soap and water. The remaining parts should only be wiped clean with a dust cloth. Your vacuum's HEPA filter needs to be replaced entirely every six months (oops, I will have to remember that!). Also, you'll want to leave time to allow the parts to air dry before you put them back on the vacuum.Step 4: Dust the Inside Compartments of the Vacuum.
One downside of owning a bagless vacuum is that the dust bin isn't sealed, and that means the inner compartments of the vacuum can get pretty dusty. The best way to clean them is to give them a good blast with a can of compressed air. You should also note that this step obviously involves lots of flying dust that can trigger your allergies and settle on any furniture nearby. Take your vacuum outside for dusting and do your best not to breathe in the path of the flying particles.Step 5: Remove the Rotating Floor Brush and Clean.
For this step, you'll need your screwdriver to unscrew the rotating floor brush's compartment. Once you've removed it, you'll probably be looking at something like this.To clean the rotating brush, get your scissors, and start cutting. You can clean lint and debris from the bristles of the brush just by giving it a good hard tap or pulling them off with your fingers. This is also a good time to inspect your vacuum's drive belt for wear and tear, cuts, or stressed areas. If you see any damage, it's time to replace it. Most big-box stores sell replacement drive belts for all major vacuum brands, and they're a breeze to replace.
Step 6: Check the air passageway for clogs before Reassembling the Floor Brush.
 Behind the floor brush on most vacuums is a small circular air passageway. This passageway is the main suction path for dirt and debris as you vacuum your floors. To ensure your vacuum works properly, you should keep this airway free of obstructions. You'll also want to check the vacuum hose for obstructions and remove any debris that may be stuck. If you find a clog here, it is most likely responsible for the reduced suction. Pull it out of the airway.
Step 7: Re-assemble Your Vacuum, Pop in a New HEPA Filter
 After all the vacuum parts you washed have dried completely, you can reassemble your vacuum and install a new HEPA post-motor filter.
 This time, write a date on the side of your filter, so you'll remember to change it every six months. Remember, this filter is what helps prevent allergens from being exhausted back into your home, so it's pretty essential for your indoor air quality – especially now that it's spring allergy season. Once you've re-assembled your vacuum, give the outer housing a good wipe-down, and you are good to go. Time to clean!
Resources and References:
HELP GETTING STARTED
- Getting Started
- Central Vacuum 101
- Best Central Vacuum
- Compare Systems
- Bag Vs Bagless
- Hose Connections
- Best Attachment Kits
- FAQ's
- Central Vac Definitions
- Troubleshooting
- Going Green
- Video Library
Need Help? Contact Us

(800) 322-2965
Log In
Create New Account