VacPort Automatic Dustpan with LED Beige

- Auto-On Inlet Yes
- LED Lights Yes
- General Construction Material polycarbonate

Ordering

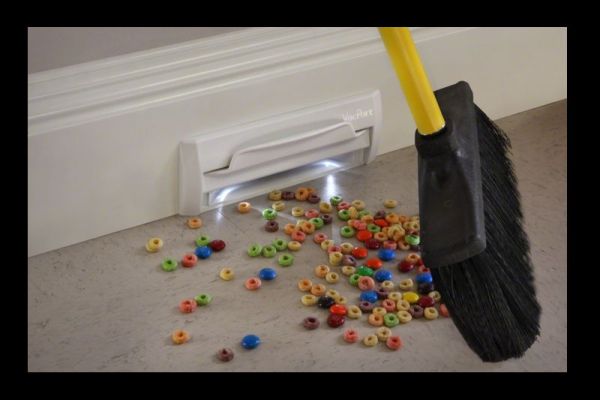
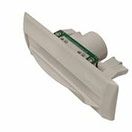 Vacport adds a new element of convenience to your central vacuum system. Just sweep dirt and debris toward the VacPort and the suction of the central vacuum unit takes it away. Convenient, easy-to-use, and virtually un-breakable! The VacPort Automatic Dustpan with LED Lights is activated with the slightest touch of your foot. It couldn't be easier. Simply sweep the dirt toward the opening and let the power of your central vacuum do the rest.
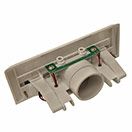 This automatic dustpan is great for use with any remote vacuum system in the kitchen, utility room, bathroom, workshops, hair salons, or any other sweepable area. White Vacport Automatic Dustpan Backside Connection When we say "un-breakable", we meant it. The VacPort Automatic Dustpan with LED Lights is made from a polycarbonate material that will not break. To further prove it to you, we have made this dustpan guaranteed for life!
How do I install the VacPort Automatic Dustpan with LED Lights?
The VacPort Automatic Dustpan with LED Lights is very easy to install. It connects straight from the back of the unit into the existing central vacuum piping. That is all there is to it! No elbows are required to make this connection. However, if you would like a more ellaborate instruction manual, continue reading below. This will give you a much better idea of the specifics. If you have any questions, feel free to call us: 1.800.322.2965. Our experts are ready and happy to help!
Installation Instructions for the VacPort Automatic Dustpan with LED Lights
Important: Disconnect the Power to the Central Vacuum before Installing
Install with Trim-Plate
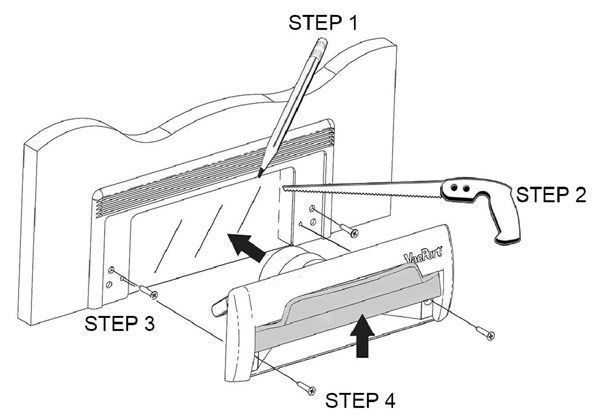
- Your VacPort is supplied with a Trim-Plate in case you need more height to reach into the cut-out. It is also used as a template to mark the cut-out. Step 1. The minimum opening is 6 1/8" wide by 2 1/2" height.
- After cutting the hole, Step 2, attach the Trim-Plate with the two pan head screws in one of the outer holes on each side, see Step 3.
- Connect the VacPort to your central vacuum with 2" diameter flex-hose.
Install Without Trim-Plate
- If you do not need the Trim-Plate, attach the VacPort directly to the wall with the two flat head screws, see Step 4. Keep Trim-Plate for future reference.
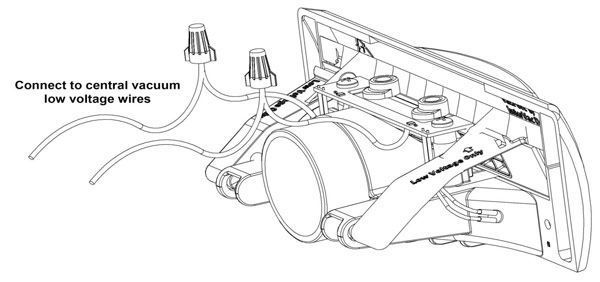
The low voltage control wires from your central vacuum power unit usually have an output of 24volt AC.
Note: Some central vacuum power units have a 24v DC output. If your central vacuum does not start, reverse the two wires at the wire nuts to reverse the polarity.
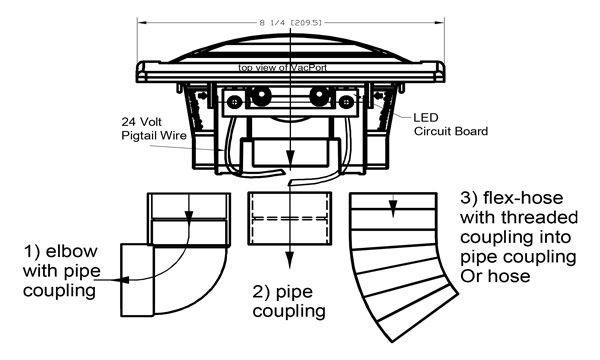
Options to Connect the VacPort to your Central Vacuum
Note: The connections to the VacPort should be flexible enough so that you can pull the flexible hose and low voltage wires out of the wall and connect both to the VacPort outside the wall.
- With PVC cement: Glue the elbow to the pipe coupling and then to the VacPort. The other end of the elbow connects to a black threaded pipe coupling. DO NOT GLUE this coupling, just twist and press fit it into the elbow. Check if you can still slide the VacPort with the flex-hose attached, in or out of the cut-out.
- With Pipe Coupling: Push black threaded coupling directly into pipe coupling.
- With Flexible Hose Direct: Connect the flexible hose directly to the VacPort's pipe with a hose clamp.
- With Flexible Hose and Pipe Coupling: Attach pipe coupling on the VacPort pipe and then insert black threaded coupling into end of pipe coupling. Press fit the flexible hose on to the black threaded coupling.
Connect the Low Voltage Wires
- Connect the 24volt wires from your central vacuum system to the VacPort. Leave slack in the wires at the connections to ensure you can pull VacPort out of wall without stress on the wires.
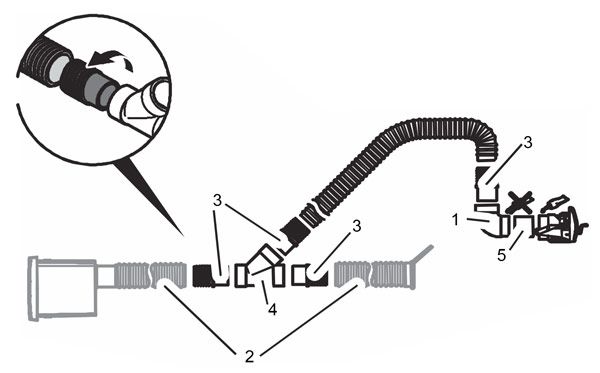
Attaching VacPort to an Existing Remote Installed Vacuum
- Elbow Fitting: Does not need to be installed. Use for tight spaces only.
- Existing Flex-Hose or Vacuum PVC Pipe: Run existing pipe straight into the 'T'(#4).
- Black Threaded Coupling: This coupling is screwed counter clockwise into the existing 2" Flex-Hose or PVC Pipe. The other end attaches to a pipe fitting with a twist and push. DO NOT GLUE.
- 45° Degree 'T' Fitting: Attach to existing hose or PVC pipe.
- Pipe Coupling: Glue to the VacPort. On the other end, you will either: A. Glue in an elbow(#1) and then press fit the threaded coupling into the other end.
B. Press fit a threaded coupling(#3) into the pipe coupling(#5).
Replacing a 'VacPan' or 'VacuSweep' with a VacPort Installation
- Remove the old dustpan from the wall.
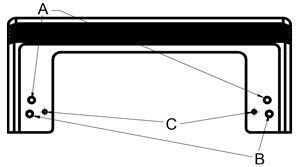
- Attach Trim Plate using the 'A' holes for a removed VacPan or 'B' holes for a removed VacuSweep.
- Mark the wall using the inside of the Trim Plate as a template.
- Remove Trim Plate from the wall and cut out an opening on the outside of the lines you just marked.
- Reattach Trim Plate to the wall.
- See 'Options to Connect VacPort to your Central Vacuum'
- See 'Connect the Low Voltage Wires'
- Now slide the VacPort into the new opening and secure with the two #8 flat head tapping screws and attach to the Trim Plate through the 'C' holes.
| Auto-On Inlet | Yes |
|---|---|
| LED Lights | Yes |
| General Construction Material | polycarbonate |
| Color | Beige |
Read about the Beige VacPort Dustpan With LED Light
 Vacport adds a new element of convenience to your central vacuum system. Just sweep dirt and debris toward the VacPort and the suction of the central vacuum unit takes it away. Convenient, easy-to-use, and virtually un-breakable! The VacPort Automatic Dustpan with LED Lights is activated with the slightest touch of your foot. It couldn't be easier. Simply sweep the dirt toward the opening and let the power of your central vacuum do the rest.
 This automatic dustpan is great for use with any remote vacuum system in the kitchen, utility room, bathroom, workshops, hair salons, or any other sweepable area. White Vacport Automatic Dustpan Backside Connection When we say "un-breakable", we meant it. The VacPort Automatic Dustpan with LED Lights is made from a polycarbonate material that will not break. To further prove it to you, we have made this dustpan guaranteed for life!
How do I install the VacPort Automatic Dustpan with LED Lights?
The VacPort Automatic Dustpan with LED Lights is very easy to install. It connects straight from the back of the unit into the existing central vacuum piping. That is all there is to it! No elbows are required to make this connection. However, if you would like a more ellaborate instruction manual, continue reading below. This will give you a much better idea of the specifics. If you have any questions, feel free to call us: 1.800.322.2965. Our experts are ready and happy to help!
Installation Instructions for the VacPort Automatic Dustpan with LED Lights
Important: Disconnect the Power to the Central Vacuum before Installing
Install with Trim-Plate
- Your VacPort is supplied with a Trim-Plate in case you need more height to reach into the cut-out. It is also used as a template to mark the cut-out. Step 1. The minimum opening is 6 1/8" wide by 2 1/2" height.
- After cutting the hole, Step 2, attach the Trim-Plate with the two pan head screws in one of the outer holes on each side, see Step 3.
- Connect the VacPort to your central vacuum with 2" diameter flex-hose.
Install Without Trim-Plate
- If you do not need the Trim-Plate, attach the VacPort directly to the wall with the two flat head screws, see Step 4. Keep Trim-Plate for future reference.
The low voltage control wires from your central vacuum power unit usually have an output of 24volt AC.
Note: Some central vacuum power units have a 24v DC output. If your central vacuum does not start, reverse the two wires at the wire nuts to reverse the polarity.

Options to Connect the VacPort to your Central Vacuum
Note: The connections to the VacPort should be flexible enough so that you can pull the flexible hose and low voltage wires out of the wall and connect both to the VacPort outside the wall.
- With PVC cement: Glue the elbow to the pipe coupling and then to the VacPort. The other end of the elbow connects to a black threaded pipe coupling. DO NOT GLUE this coupling, just twist and press fit it into the elbow. Check if you can still slide the VacPort with the flex-hose attached, in or out of the cut-out.
- With Pipe Coupling: Push black threaded coupling directly into pipe coupling.
- With Flexible Hose Direct: Connect the flexible hose directly to the VacPort's pipe with a hose clamp.
- With Flexible Hose and Pipe Coupling: Attach pipe coupling on the VacPort pipe and then insert black threaded coupling into end of pipe coupling. Press fit the flexible hose on to the black threaded coupling.

Connect the Low Voltage Wires
- Connect the 24volt wires from your central vacuum system to the VacPort. Leave slack in the wires at the connections to ensure you can pull VacPort out of wall without stress on the wires.

Attaching VacPort to an Existing Remote Installed Vacuum
- Elbow Fitting: Does not need to be installed. Use for tight spaces only.
- Existing Flex-Hose or Vacuum PVC Pipe: Run existing pipe straight into the 'T'(#4).
- Black Threaded Coupling: This coupling is screwed counter clockwise into the existing 2" Flex-Hose or PVC Pipe. The other end attaches to a pipe fitting with a twist and push. DO NOT GLUE.
- 45° Degree 'T' Fitting: Attach to existing hose or PVC pipe.
- Pipe Coupling: Glue to the VacPort. On the other end, you will either: A. Glue in an elbow(#1) and then press fit the threaded coupling into the other end.
B. Press fit a threaded coupling(#3) into the pipe coupling(#5).

Replacing a 'VacPan' or 'VacuSweep' with a VacPort Installation
- Remove the old dustpan from the wall.
- Attach Trim Plate using the 'A' holes for a removed VacPan or 'B' holes for a removed VacuSweep.
- Mark the wall using the inside of the Trim Plate as a template.
- Remove Trim Plate from the wall and cut out an opening on the outside of the lines you just marked.
- Reattach Trim Plate to the wall.
- See 'Options to Connect VacPort to your Central Vacuum'
- See 'Connect the Low Voltage Wires'
- Now slide the VacPort into the new opening and secure with the two #8 flat head tapping screws and attach to the Trim Plate through the 'C' holes.



Log In
Create New Account